Showing posts with label organization. Show all posts

Tuesday, May 14, 2013

New Items in the Shop!

Here are the three most recent items I have added to my Etsy shop!

Lots of customization options to help you create a product that is perfect for you!


I am happy to do custom orders as well!  Just let me know!


Blissful Keeper at Home Etsy Shop is Open!

Hi everyone!

Exciting news!  I just opened my own Etsy shop!
I don't have a large assortment of items available at the moment, but have lots of ideas in my head!


Be sure to check it out regularly to see what new items I have added.  Enjoy!


Wednesday, January 9, 2013

Updated Monthly Blog Planner

Hello Everyone!

Last August I shared with you my blog planning sheets.  Since then I have re-designed my monthly planning page to better accommodate the changes in my blogging habits:
  • I started blogging more frequently.
  • I wasn't using the planning space provided for each blog post.
  • I wanted to start keeping track of my pageviews and comments.
Here's what I came up with:

 Free for personal use only, thank you.


Happy Blogging!

Tuesday, January 8, 2013

My Petite Pantry - Updated and Organized!


Hello Everyone!  I'm so excited to share with you how I updated and organized my pantry for Week 2 of the New Year's Organizing Revolution!  This is a project I have been wanting to tackle for a while now, but was needing a motivational boost.  This organizing challenge was just what I needed!

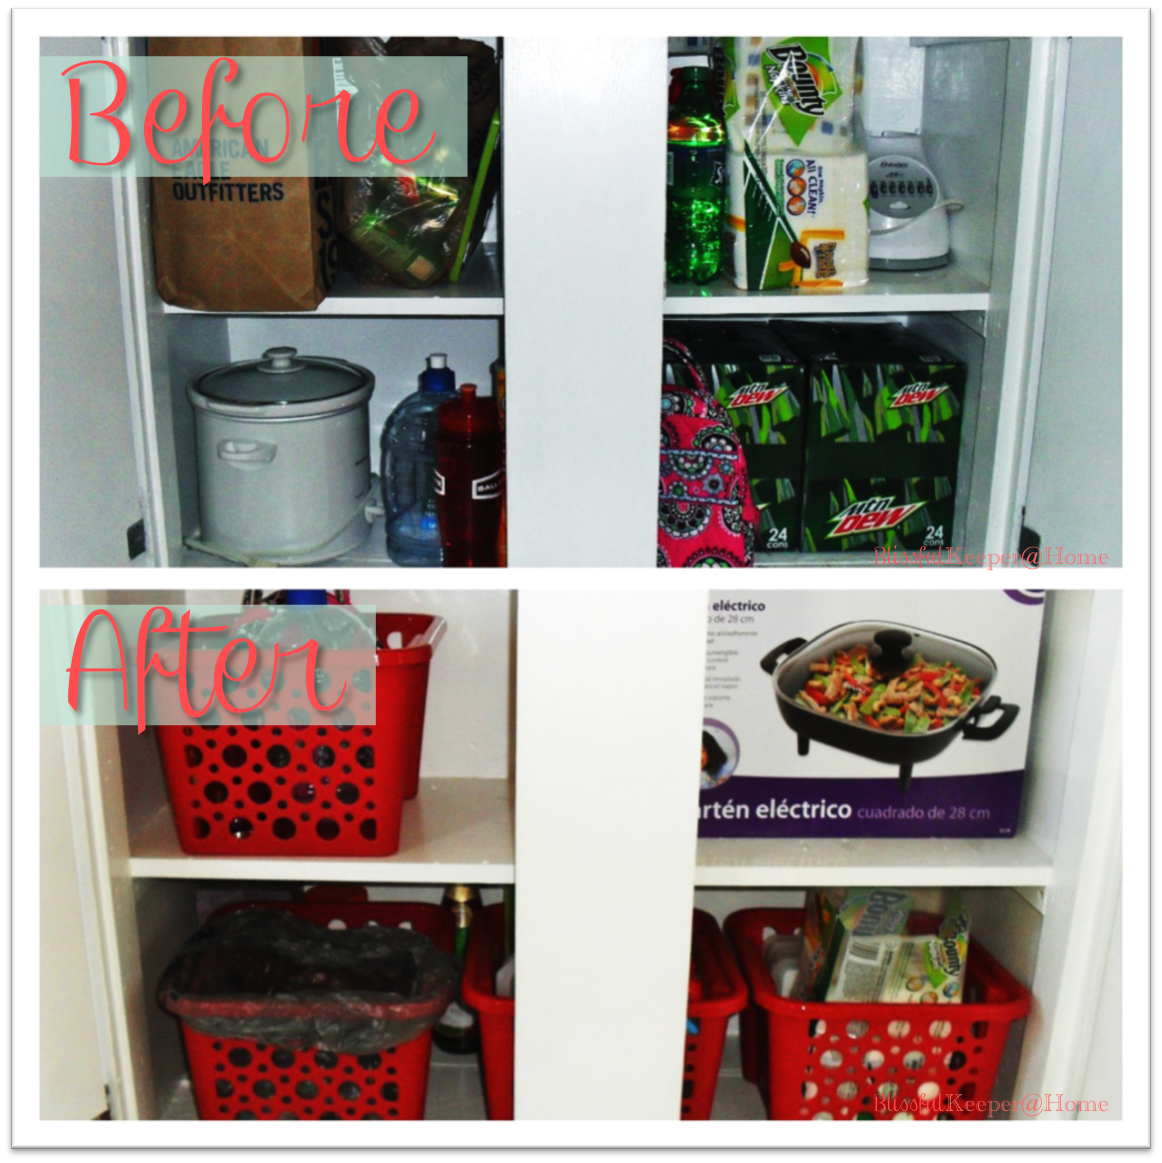
I'm sorry I don't have a before picture.  I was over half-way through emptying the pantry when I realized..."Oh no!  I didn't take a before picture!"  I was too tired to put everything back just to take a picture, so you'll have to imagine all the contents in the picture below stuffed in the pantry with almost no labels.

I started out by wiping down all the shelves so I would have a nice, clean pantry to work with.  Then I covered the back of the pantry with some pretty wrapping paper using some spray adhesive.  I didn't want it to be too permanent, so I let the adhesive dry a few minutes before attaching it to the back of the pantry.  Hopefully it won't be too difficult to remove later on down the road when I decide to do something else with the pantry.  I feel the wrapping paper gives the pantry a much more feminine and elegant look and helps break up the white space without being too distracting.


Here is all the food that was in the pantry.  The green baskets were set aside to be used somewhere else in our home.  The green just isn't doing it for me anymore.

Organizing the Pantry
My pantry is rather small, 7ft H x 2ft W x 1ft D, and the shelves are not adjustable.  Below is a list of items I used to organize my petite pantry.
  • Wire Shelves:  In an effort to maximize the storage capacity of my petite pantry I've used free-standing wire shelves which almost double the amount of storage space of the shelves on which they're used.
  • Baskets:  I have also used baskets (I love baskets!) to help keep like-items together.  This helps a great deal in keeping things organized.  
  • Labels:  And last but certainly not least...LABELS!  (I love labels, too, especially ones from the Martha Stewart line at Staples!)  Five out of my six shelves are labeled, along with most of the storage containers and baskets.  This helps other members of the family (my husband) locate items and return them to their proper place, thus maintaining the organization I've worked so hard to achieve (okay, so I didn't really work that hard.)


Now let's take a closer look at the contents of each shelf so you can see how I chose to organize my pantry.

I decided to place all of our paper goods on the top shelf since they are not used very often and this shelf is not the easiest for me to reach.  Paper plates, bowls and napkins are stored on their side so they take up less space and are actually easier to get to.  Empty salsa jars make great storage containers for plastic ware, straws and plastic baggies.  Just add some Martha Stewart labels and you have cute storage!  Paper cups are stored behind the glass jars.

My husband and I have oatmeal as part of our breakfast every Sunday morning.  I usually have mine with a bit of sugar and dried cranberries and he has his with brown sugar.  In order to cut costs I buy the large containers of quick oats and portion them out into these little clear containers.  I add the sugar/brown sugar and then tuck them away in the pantry so they are easy to grab on Sunday mornings.  When I organized the pantry I decided to use a separate basket for each of us so that we don't mix them up, and of course I labeled them!  Taller items go to the left of the wire shelf, while smaller items sit on the shelf.

This is the shelf I probably access the most when preparing supper.  I keep all my canned goods, boxed pasta, pasta sauce and instant potatoes here.  I try to keep the veggies sorted by variety, but this isn't always possible with this small of a pantry.

I was amazed that after filling five of the six shelves these two items were all I was left with!  Before all six shelves appeared to be cram-packed!  Obviously, organizing the pantry opened up some storage space which makes me very happy!

Here's the "Snack Shelf" where all the crackers, chips, cookies, etc. are stored.  Storing the saltines in the large container made a huge difference in the amount of storage space I had.  I was able to put almost two whole boxes of saltines in this container!  Boxed items are stored nicely on their backs and stacked under the shelf while bags of chips work well in the basket.

And, last but not least, my baking supplies.  I have future plans for this shelf, but until it's warm enough to spray paint, they will have to wait.  As you can see, I store extra flour, sugar and canola oil here along with other baking staples such as brown sugar, shortening, powdered sugar, chocolate chips, Karo syrup, coconut flakes and so on.  I don't do a whole lot of baking, so the fact that these items are stored on the very bottom shelf doesn't bother me.  Perhaps once I become more comfortable baking these items will move up or find a new home entirely.

This project only took me a few hours to complete and was definitely worth the time!  I love looking in my pantry and seeing the pretty background and all the lovely labels!

Voting starts Friday!  Please vote for my petite and organized pantry!
I'm #37!

Have a blessed and organized day!
Linking @

Friday, January 4, 2013

Office Space Re-Organization Explained

Yesterday I showed you the before and after photos of my re-organized office space for Week 1 of the:

 Today I'm going to share with you the fun details of how I improved the space!


1.  Messy catch-all shelf.  Everything that doesn't have a home or an easy-access home lands here...and piles and piles up!  Not exactly what I'd like to have going on here.
2.  Amazing stacking trays from the Container Store.  The top tray holds printer paper and envelopes (which you cannot see in this picture) and the bottom tray is outfitted two Austin Cracker boxes that act as drawers and hold notes and receipts.
3.  Paper sorter with my immediate filing system, blogging notebook, envelopes for our money-management system and several papers that need to be sorted through.
4.  These cords are always being rolled over and getting tangled in the chair legs.  I need to find a solution so that they are out of the way.


1.  Shelf is currently cleaned off.  I am going to try to implement my filing system much more and find an easy-access home for the odds-and-ends that end up on this shelf.
2.  I covered the Austin Cracker boxes with some pretty wrapping paper and added a couple Martha Stewart File Folder labels to give them a more finished look.

 They're so pretty now!!

3.  I cleaned out my paper sorter so that only the items that truly belong reside there.  In the back I keep my immediate filing system that I use when sorting the mail:  Blog Planning, Bills to Pay, Need to File, Receipts to File, and Coupons.  In the front of the letter sorter are empty envelopes for our envelope money-managing system.  When envelopes have $$ in them, they go in my purse.  Unfortunately, most of these envelopes never make it into my purse.
4.  No more cords in the way!  (They are hiding behind the storage shelf.)

New! - I found a piece of cork I'd been holding onto and painted a white chevron design on it.  With the newly arranged space I had the perfect spot to hang it!

Face-lift - I tucked some of the wrapping paper I used to cover the Austin Cracker boxes into a little Mason jar.  I am using the Mason jar to hold pens, pencils and a pair of scissors.


5.  Extra pens that don't belong - I love my multi-colored pens, but am not happy with how they look in the space.  I prefer a more stream-lined, simple look.
6.  Loose papers, notebooks, etc. just shoved into space - most of which need a new home.
7.  Items that don't belong either because I never use them or because they take away from the stream-lined, simple look I am trying to achieve.
8.  Awkward spacing between desk and wall.  Arranging the desk and shelf was a challenge for me when I first moved them into the space.  I am sure I had a reason for putting the shelf between the desk and the wall, but I couldn't think of it the other day, so under the desk it went!
9.  Exposed cords.


5.  Extra pens re-located to new home.
6.  Loose papers, notebooks, etc. re-located to new home.  Heavy weight printer paper now stored here.
7.  Items that don't belong removed and binders (most of them) given labels using the same font and color to achieve stream-lined effect.d
8.  Moving the shelf under the desk really changed the look of the space!  I like how it hides the shelf and the items stored within.
9.  Since I moved the shelf I was able to tuck the formerly exposed cords behind the shelf.  Now they are hidden and out of the way!

This was a fun and fairly easy project that I was able to complete in just a few hours.  Can't wait to tackle my kitchen for next week's challenge!


Linking @
The Sunday Showcase Party @ Under the Table and Dreaming
Making the World Cuter Monday @ Making the World Cuter
Made by You Monday @ Skip to My Lou 
Mop It Up Monday @ I Should Be Mopping the Floor
Tutorials and Tips Link Party @ Home Stories A to Z
Titus 2 Tuesday @ Cornerstone Confessions
Lil' Luna Link Party @ Lil' Luna
The Creative Spark @ Clean and Scentsible
Wow Me Wednesday @ Ginger Snap Crafts
Whatever Goes Wednesday @ Someday Crafts
Delightfully Inspiring Thursday Party @ Delightful Order
The 36th Avenue Party Time @ The 36th Avenue
Frugal Friday @ The Shabby Nest
Finished Friday @ All Our Days
Frugalicious Friday @ Finding Fabulous

Thursday, January 3, 2013

Office Space Re-Organization!


Hello all!  Some of my favorite and most inspirational bloggers have a great challenge going on this month!  You can read more about it here at Organizing Homelife.

This week's organization challenge was the office/desk space, an area in my home that was fairly well organized already, but as well all know, there's always room for improvement!

Here's my office/desk space before and after I gave it a bit of a face-lift and did some tidying:


 Tomorrow I'll show you what I did to change the look and functionality of the space!

Update!  I've posted the details about how I transformed this space here

Please vote for my re-organized office here.  I'm # 100!


Linking @ 

Tuesday, October 30, 2012

A Month of Cleaning: Days 13 & 14


Upstairs Bathroom Before & After:
 I pulled these storage boxes out of the cabinet and stacked them on top to create more storage space inside the cabinet.  This helped a ton!  The items stored in them are ones we don't use frequently, so storing them up here out of the way made more sense than having them take up valuable easy-access space.


Downstairs Bathroom Before & After:
 The cabinets pictured above and below hang above my washer and dryer.
Hence all the laundry products!


Happy Cleaning!

Saturday, October 27, 2012

A Month of Cleaning: Day 10


 Lower cabinets between fridge and corner.  I thought it made more sense to have the Mountain Dew stock next to the fridge than across the room.  Also, I've gone back to washing dishes by hand (we have super hard water and even with a rinse agent our dishes still have hard water spots when washed in the dishwasher) so I wanted to use the drying rack for it's intended purpose.  A couple baskets from the Dollar Tree made for a fine replacement...actually, they work better because they hold more!


 Under the sink were my kitchen cleaning supplies and a tub for recycles.  I decided to move all my cleaning supplies into the kitchen and create a space for me to store the dish drainer when I want it to be out of sight.  Still haven't found a good system for our recycles, though.


 The built-ins between the kitchen and dining room were a hodge-podge of whatever.  Now the small kitchen electronics are all together (except the electric skillet which I just got from my mom), the crock-pots are all together, and this space is much more organized, thanks to more bins from the Dollar Tree.


 Didn't change a whole lot here, just cleaned out the extra that didn't really belong.  The white basket holds a variety of recipes that are waiting to be stored in a binder of sorts.  But that's a project for when we have some extra $$, so in the basket they will sit.


 I have a tendency to save glass jars, large cans and plastic coffee containers for "that organization project down the road."  However, the kitchen isn't the most practical place to store them.  They all have been relocated so I can make better use of the cabinet space.


 I didn't change a whole lot in these cabinets.  Mostly just did some tidying up and a little re-arranging.  Thy are working pretty well for me, though I do have some plans for them down the road.


Things aren't perfect, but they're much improved.  Adding a few storage bins from the Dollar Tree really helped.  Once I have some more money to spend I'd like to add some more storage to the inside of the cabinet doors for things like aluminum foil and plastic wrap.  All in good time. :)

Happy Organizing!