Showing posts with label diy. Show all posts

Wednesday, November 21, 2012

Tyler's Dresser is Finished!

I'm sure you all remember what this dresser looked like before.
But just in case you don't...


And here is what it looks like now!


I painted the frame with ColorPlace India Black Tea and the drawers with BHG Cream Mist.  The drawer pulls and knobs received a coat of Rust-Oleum's Metallic Oil Rubbed Bronze spray paint.  It isn't perfect, but it's beautiful to me and looks great in the nursery.  Hubs and I are very pleased with how this turned out!

Love,

Tuesday, November 13, 2012

A Dresser for Tyler

Last Tuesday I finally did something I have been wanting to do for weeks:  prime Ryan's old dresser.  I spent way too many hours filling in an assortment of etchings, carvings, dings and scratches and sanding...partly because I'm an over-achiever and was sanding too much.  Oops!  Definitely something I don't plan to do on my next project!

Here's a quick reminder of what I started out with:

 And here is the dresser all primed and waiting to be painted!

It already looks like a completely different dresser!  Last Saturday while my momma and sisters were in town for my shower I was able to solicit some help from my baby sister.  She was sweet enough to spray paint the old drawer pulls/knobs for me so I didn't have to be around the fumes.  She spray painted them with Rust-Oleum's Metallic Oil Rubbed Bronze, and they look beautiful!  She only had time to do the front (which is all that will really show anyway), before she needed to head back up to Purdue. But I'll probably take them off sometime in the spring and do the backs, just because it'll make the project feel more complete and thoroughly finished. 

Lord willing, I'm off to buy paint today!

Friday, November 2, 2012

Nursery Update!

It's been slow-going in the nursery these past few months.  I guess there is still "too much" time before baby Tyler will arrive for me to really buckle down and get to work.  I have made quite a bit of progress towards cleaning out the room, though.

Visit this post to get a glimpse of the mess it was before.

Here's where we're at now:

 Everything in this corner is baby related.  Not all of it will stay in the nursery, though.


 Pile of cardboard boxes that have since made it to the basement...this corner is empty now!  Yay!


 Pile of "stuff" that still needs to find a new home.  Some of it is my husbands that he needs to sort through.  I plan on painting the rug and updating one of the laps for the nursery.  The Big Lots bag is gone, now.


Everything you see here (except Tyler's clothes) need a new home.  Still trying to figure out where to store everything!  I plan to made a new cover for the beanbag...so that's another project waiting for me to have time and energy to tackle it.


Oh, and here's what I've been working on sporadically for the past few weeks:

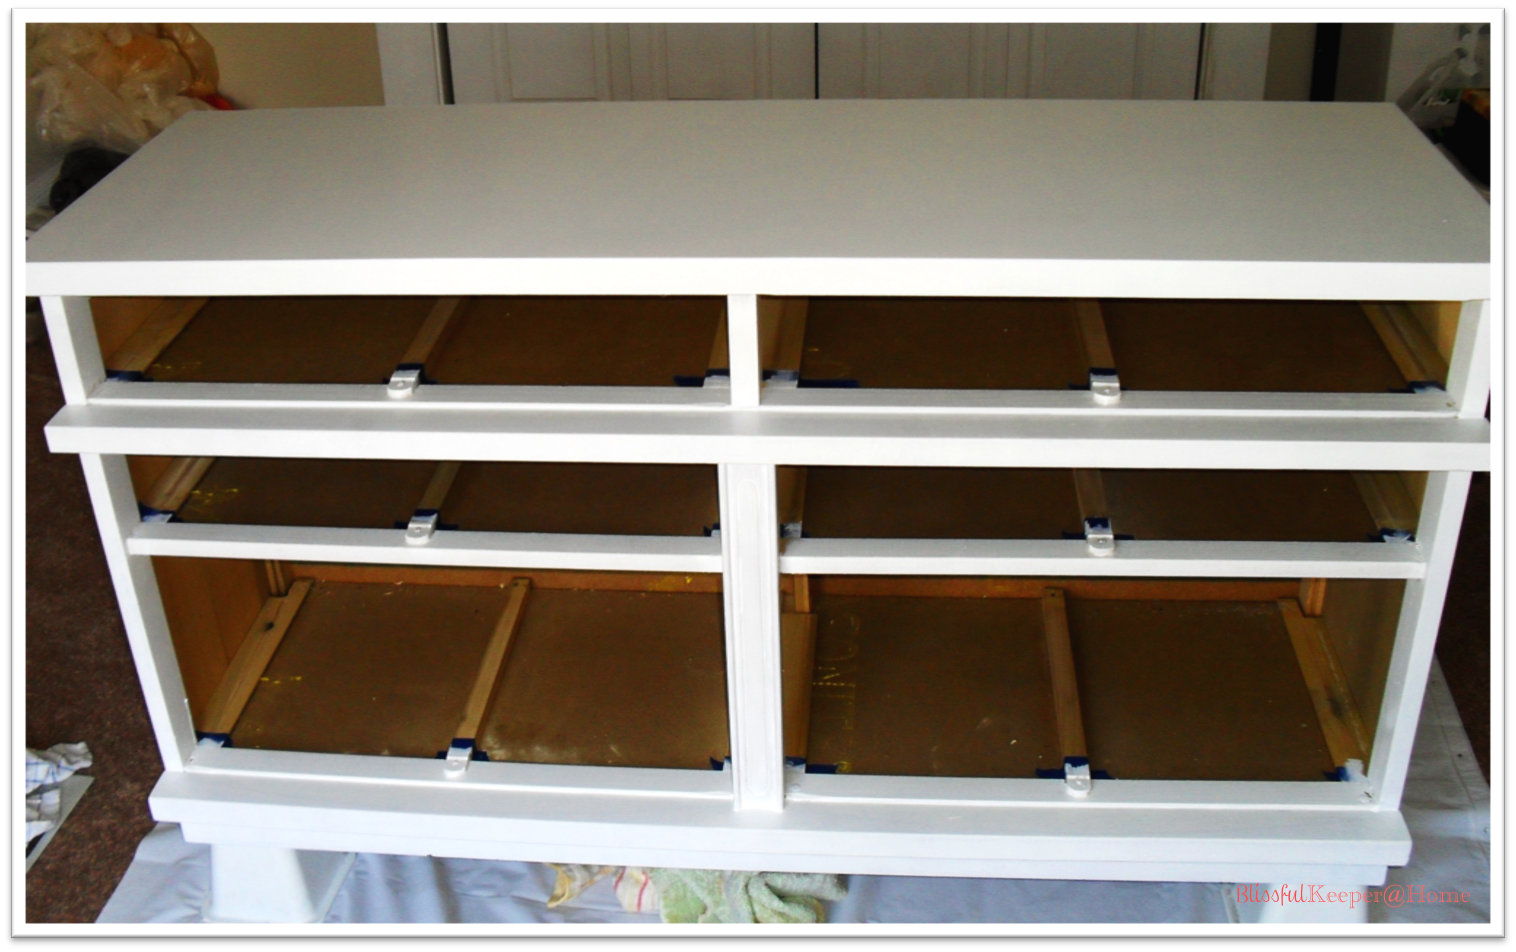
This is my husband's old dresser from his teen-punk-skater days.  So far I have only been filling the various etchings with wood-filler and sanding.  I hope to prime it today or tomorrow.  This is my first time re-finishing a piece of furniture and using wood-filler.  It's definitely been a challenge!

I have most of the fabric and sewing notions needed to make the crib skirt, sheets, crib bumper and changing pad cover, so I plan to start sewing this weekend, too!  Stay in touch to see how this room makes it's transformation from a messy storage room to a sweet little nursery for our baby boy!

Have a wonderful day!

Wednesday, October 3, 2012

A Month of Cleaning: Days 1-3


Here are the two recipes I found and used to create my own:
  1. Borax/Water Recipe
  2. DIY Grease-Cutting Floor Cleaner


Recipe Source:  Homemade Floor Cleaner


You can find all these recipe sources on my "A Month of Cleaning" Pinterest Board.  I will be pinning all my sources on this board throughout the month.

Happy Cleaning!

Sunday, September 23, 2012

OperationOrganize: Small Supply Storage


Here's the first "OperationOrganize" project I've completed for my office/craft storage closet.  I had seen several pins where people used over-the-door shoe organizers to organize pantry items, craft supplies, toys, etc...and so I chose to use this tool to organize some of my smaller office/craft supplies.

Here are the items I used to complete this project:
- 24 count clear over-the-door shoe organizer
- 1 package tiny clothes pins
- labels I designed on the computer
- brown cardstock
- glue stick
- scissors
- paper cutter

First, I hung my shoe organizer and filled it with all the supplies I wanted to store in it.  Then I made a list of all the items so I would know exactly what labels to make.  Then I went to the computer!

Here are my lovely labels.  I used PowerPoint to design them.


I cut them out by hand and used the glue stick to adhere them onto brown cardstock I had cut using my paper cutter.


Here are some pictures of my finished product!


 This was a fun and super simple project...and it made a huge difference in my storage space.  Now a lot of the items I use on a regular basis are easy to access and easy to find.


Linking @:
The Sunday Showcase Party @ Under the Table and Dreaming
Making the World Cuter Monday @ Making the World Cuter
Tutorials and Tips Link Party @ Home Stories A to Z 
Meet Me Monday Link Party @ You're Talking Too Much
Craft and Tell @ Cherished Bliss
Take-A-Look Tuesday @ Sugar Bee Crafts
Our Favorite Things Link Party @ My Life's a Treasure 
Lil' Luna Link Party @ Lil' Luna
Home Decor and Organizing Link Party @ Organize and Decorate Everything 
The Creative Spark @ Clean and Scentsible
Wow Me Wednesday @ Ginger Snap Crafts
Whatever Goes Wednesday @ Someday Crafts
Delightfully Inspiring Thursday Party @ Delightful Order
The 36th Avenue Party Time @ The 36th Avenue
Frugal Friday @ The Shabby Nest 

Monday, September 17, 2012

Project Planning Sheet

My mind has been going about a-mile-a-minute the past few weeks, coming up with ideas for projects much faster than I can even begin to complete them.  To help me keep track of these projects, I created this little planning sheet. 


These sheets allow me to quickly jot down my ideas, materials I think will be needed, and materials I already have.  I also included a spot for me to record the "start" and "complete" date for each project. (Hopefully this will motivate me to finish them in a timely manner!)  I printed off 3 of these sheets and have already filled up 11 of the 12 project sections.  Some of the projects I included are ones I started months ago, so they won't have an accurate start/complete date.  However, this will help me remember to actually finish them.

Feel free to print them for your personal use. :)


Happy Homemaking, Crafting, DIYing and Blogging!

Friday, August 31, 2012

All Natural Homemade Cleaning Solutions

In the past several months I have made the switch from hard, hazardous chemical cleaners to gentle, non-toxic cleaners.  These are more cost-effective than store bought cleaners and I don't need to be terribly concerned about little ones getting into them.  They are easy to make, easy on my skin and eyes, and don't give me massive headaches like most other cleaners.

Here is a chart of my favorite recipes for the cleaning solutions I use most often.


Sources: 
Young House Love - Clean Up Your Act:  All Natural Homemade Cleaners
Kitchen Stewardship - Natural Kitchen Cleaners:  What's Under My Sink?
Food.com - Tub and Shower Magic


Tuesday, August 21, 2012

Upcycled Oraganizing Trays


Last week I showed you the rather messy drawer of our entry table (which became my desk last week after I shared that post.)  Here's what the drawer looked like before we re-arranged the living room and turned it into my desk.

Since the table is now serving a new purpose, I had the motivation to work on the drawer.  I decided to relocate all the "stuff" that was currently occupying this drawer (as I don't use it frequently and had other items I wanted to place in the space), so I was able to start with a clean slate.  The first thing I did was to empty the drawer and gather the items I wanted to store there.  Then I got to work creating some cute trays for organizing the new occupants of the drawer.  I had been saving the cardboard packaging from some snack crackers and decided they were just the thing for this project!  I also found some cute scrapbook paper I had on hand that I thought would go well with the drawer and our living room decor.

Here are my supplies:
I measured the bottom of the box and cut paper to fit inside.  Since I was placing the boxes side-by-side vertically I didn't wast the paper covering them.  I did cover one of the ends on each box because I knew I might place the trays towards the back, exposing these sides.  Once I had all the pieces cut to size, I used a glue stick to adhere the paper to the boxes.

Here are the cute trays I ended up with!
I haven't finished organizing the drawer, so you'll have to come back later to see the finished project!

Linking @:

Monday, July 30, 2012

DIY Chevron Marble Magnets

Again, this is a project I have been "planning" to do for several months that I'm finally making the time for!  Now that I'm through the first trimester, I'm realizing that time is going by much faster than I anticipated, so I'm trying to get as much done as I can before baby arrives.  I know, I sill have several months, but you haven't seen the nursery yet!  EEKS!

I had seen several pins on Pinterest for these cute and easy DIY magnets.  I recently found a tutorial at Tripping Over Joy that was simple and easy to follow here.  So...I gathered my materials and began working on the design for my magnets.

 Materials:
  • glass marbles - ones that have a flat side - I bought these Jumbo Clear Luster Gems at the Dollar Store
  • craft glue - that dries clear (I used rubber cement because that is what I had on hand.  It didn't work the best, so I would recommend using a different glue that is stronger.)
  • image to you want to decorate marbles with
  • magnetic buttons
I am making these for our kitchen, so I decided to make them match the chevron theme I already had going on with these pieces. I chose to keep the design fairly simple, just using words and a chevron background.  (I used the grey chevron printable paper I found here at Mel Stampz for the background.  She has LOTS of wonderful available to match any decor!)  I chose words that have to do with faith, family and living for God.  I thought this would be a nice gentle reminder for my family of how we are to conduct ourselves.  Here is what I came up with:


I measured my gems and made my circles to fit the gems.  Most of my gems were at least 1" diameter, so that's the size I made my circles.  Then I made the font boxes for the words and fit them into the circles.  I don't have a fancy circle punch, so these babies were cut out by hand!

Then I glued them face down to the flat side of the marbles.  The magnets I bought were self-adhesive, so attaching them to the backs of the marbles was a sinch!

My finished product!
Hint:  If you are using rubber cement, make sure you let the glue dry completely (20-30 minutes) before placing on your magnetic surface.  I didn't wait, and when I went to re-arrange the magnets the paper came off the marble gems and I had to re-glue several.

My husband and I love these!  They are cute, one-of-a-kind, functional, encouraging and uplifting!  How could magnets get any better?

Linking @:
The Sunday Showcase Party @ Under the Table and Dreaming 
Tutorials & Tips Link Party  @ Home Stories A to Z
Craft and Tell @ Cherished Bliss
Take-A-Look Tuesday @ Sugar Bee Crafs
Tip Me Tuesday @ Tip Junkie
Tip Junkie handmade projects
Home Decor and Organizing Link Party @ Organize and Decorate Everything
Lil' Luna Link Party @ Lil' Luna 
Whatever Goes Wednesday @ Someday Crafts 
Delightfully Inspiring Thursday Party @ Delightful Order
The 36th Avenue Party Time @ The 36th Avenue
Frugal Friday @ The Shabby Nest 
Weekend Wrap Up Party @ Tatertots&Jello
The Creative Spark @ Clean $ Scentsible 

Monday, July 2, 2012

Master Bath Cabinet Facelift

Last month I decided to FINALLY give the inside of the cabinet in our master bathroom a facelift.  I had planned this project a while back, but with the exhaustion of early pregnancy taking over my life, I hadn't worked up the motivation to actually DO the project.  Around the middle of June (9-10 weeks into my pregnancy) I was starting to have energy again, YES!

Plain white interior...not so pretty.

Here's my step-be-step process for beautifying the interior of our bathroom cabinet.

1. Gather materials:
  • Self-adhesive wrapping paper of choice, make sure you have enough to cover the entire surface you plan to cover, I just barely had enough!  I used a wedding themed paper from Hallmark.
  • Spray adhesive - I used Scotch
  • Craft glue
  • Ribbon - approximately same width as shelf fronts
  • Utility knife
  • Scissors
  • Screw driver
  • Cleaner of choice - I used a 1 part water, 1 part vinegar solution
2.  Empty the cabinet, remove the doors and take out the shelves.

3.  Place the paper on the back side of the cabinet.  Make sure it covers the entire back and try to get it as smooth as possible.
4.  Use the utility knife to trim the excess paper.  For a nice, clean cut make sure you are using a sharp blade.  If the blade is dull, it will cause the paper to rip.  Not what you want.
5.  Leaving the paper in, peel back one side and spray the adhesive on the back of the cabinet.  I would recommend covering your vanity to protect it from over-spray.  I worked from left to right.  Once I had the far left side glued down, I peeled the paper back towards the left and began gluing from there.  Be sure to smooth out your paper as you work, otherwise you will have bubbles and wrinkles.

Nice, smooth, pretty papered back.

Next we move onto the shelves!
6.  Cut to pieces of ribbon to match the length of your shelves.  I chose to cut mine a little long and trimmed closer after it was glued down.
7.  Apply craft glue to the edge of the shelf that will be facing out.  I chose to apply it in a zig-zag pattern and then smoothed it with my finger to have an even, thin coat.

8.  Carefully place the ribbon on the shelf edge with glue.  Again, I worked from left to right.  My ribbon was just a hair or two wider than my shelf edge, so I had to make sure it was even across the top, and only hung over on the bottom.
9.   Repeat steps 7 and 8 with second shelf.

10.  Place shelves in cabinet and then hang the doors.

11.  Fill with health and beauty products as desired.

What a pretty cabinet!

Friday, June 1, 2012

Patriotic Printables!

My husband and I have decided that every three months I would change the decor in our living room and on the porch.  We broke down the year by seasons.  This is the schedule we came up with:
  • December-February:  Winter, Snow, Snowmen etc.
  • March-May:  Spring, Flowers etc.
  • June-August:  Summer, Patriotic, Stars etc.
  • September-November:  Autumn, Pumpkins, Leaves etc.
Due to some news we learned in early May, my mind has been very focused on matters other than our decor...so up until this morning I had yet to really begin working on our summer decor.

Here's some patriotic printables I created this morning.  Feel free to download them and use for your personal use!

Happy 1st Day of June!